目录
【训练】Qwen2.5VL 多机多卡 Grounding Box定位(1):http://101.126.150.28:7878/post/2067
【训练】Qwen2.5VL 多机多卡 Grounding Box定位(2):http://101.126.150.28:7878/post/2094
之前的相关文章:
【深度学习】LLaMA-Factory微调sft Qwen2-VL进行印章识别
https://www.dong-blog.fun/post/1661
使用LLaMA-Factory微调sft Qwen2-VL-7B-Instruct
https://www.dong-blog.fun/post/1762
构建最新的LLaMA-Factory镜像
https://www.dong-blog.fun/post/1799
关于Grounding 如何不偏移的问题解决
看了一些帖子:
- https://github.com/QwenLM/Qwen2.5-VL/issues/1094
- https://github.com/QwenLM/Qwen2.5-VL/issues/950
- https://github.com/QwenLM/Qwen2.5-VL/issues/900
- https://github.com/QwenLM/Qwen2.5-VL/issues/866
- https://github.com/QwenLM/Qwen2.5-VL/issues/721
- https://github.com/QwenLM/Qwen2.5-VL/issues/584
- https://github.com/QwenLM/Qwen2.5-VL/issues/830
- https://github.com/QwenLM/Qwen2.5-VL/issues/773
所以有一些关于 Qwen2.5VL Grounding 的结论:
- 官方微调用的是这样的格式,所以在prompt中也无需特殊的格式/
json展开代码[
    {"bbox_2d": [x1, y1, x2, y2], "label": "obj_name/description"},
    {"bbox_2d": [x1, y1, x2, y2], "label": "obj_name/description"},
    {"bbox_2d": [x1, y1, x2, y2], "label": "obj_name/description"},
]
-
官方还是这么做了,因为底层对28的切割性质,所以要这么做,不然真会偏一点: 在 Qwen2.5-VL 中,我们首先调整输入图像的大小,以确保其宽高为 28*n,然后使用调整后图像上的绝对坐标作为最终目标。
-
使用 (左, 上), (右, 下) 坐标,不用归一化到0-1000.
-
您好,根据您的描述,我怀疑问题出在 Qwen2-VL 和 Qwen2.5-VL 中 bbox 坐标的处理方式不同。具体来说,我们在 Qwen2.5-VL-7B 中现在使用的是绝对坐标,而不是 Qwen2-VL 中使用的相对坐标(后者被缩放到 [0,1000])。 例如,在 Qwen2-VL 中,640x640 图像中 [0, 0, 320, 320] 的边界框用 (0, 0), (500, 500) 表示。但在 Qwen2.5-VL 中,我们直接使用 [0, 0, 320, 320] 或 (0,0),(320,320)。此外,如果在图像增强过程中将图像尺寸调整为 1280x1280,则坐标现在应相应地扩展为 [0, 0, 640, 640]。
由于 Qwen2.5-VL 使用绝对坐标进行训练,我建议在微调时也使用相同的绝对坐标系。如果您出于某种原因坚持使用相对坐标,可以延长训练时间,看看偏差问题是否会随着训练时间的延长而消失。
供大家参考,详细坐标流程如下:
调整图像大小,使高度和宽度为 28*n resized_w, resized_h = smart_resize(img_w, img_h) 相应地改变绝对坐标 new_bbox = bbox / np.array([img_w, img_h, img_w, img_h]) * np.array([resized_w, resized_h, resized_w, resized_h])) 如果使用绝对坐标后仍然观察到明显的 grounding 偏差,则另一个可能的问题在于图像的大小。如果图像非常大或非常小(例如,> 4k 4k 或 < 320 320),则模型很可能会输出有偏差的 bbox 结果。
-
新版本的transformers才没有rope问题,安装: pip install git+https://github.com/huggingface/transformers
对自己图像的处理
调整图像大小,使高度和宽度为 28 * n 。坐标使用绝对坐标,无需特殊格式。使用正确的transformer版本。
llamafactory 的数据要求:
https://llamafactory.readthedocs.io/zh-cn/latest/getting_started/data_preparation.html#id16
llamafactory 如何解析这类数据:
https://www.dong-blog.fun/post/2077
我的数据样本 xdx_b_intervl8btrain_28.json
展开代码{ "messages": [ { "content": "<image>点[56,259]所处位置的信息是什么?", "role": "user" }, { "content": "<ref>文本-地址</ref><box>[[33, 241, 66, 264]]</box>", "role": "assistant" } ], "images": [ "/img_datasets/img_small_size_28/didichuxing-20240914171548.jpg" ] }
对应的dataset_info.json中的描述应该是:
展开代码{
    "grounding1": {
      "file_name": "xdx_b_intervl8btrain_28.json",
      "formatting": "sharegpt",
      "columns": {
        "messages": "messages",
        "images": "images"
      },
      "tags": {
        "role_tag": "role",
        "content_tag": "content",
        "user_tag": "user",
        "assistant_tag": "assistant"
      }
    }
}
启动训练
bash展开代码cd LLaMA-Factory

docker run -it --gpus  '"device=0,2,3,4,5,6,7"' \
    -v /data/xiedong/train_qwenvl25_for_grounding/data:/app/data \
    -v ./output:/app/output \
    -v ./examples:/app/examples \
    -v /data/xiedong/train_qwenvl25_for_grounding:/img_datasets \
    -v /data/xiedong/vlm_r1_train_tools/Qwen2.5-VL-7B-Instruct:/Qwen2.5-VL-7B-Instruct \
    --shm-size 32G \
    -p 8034:7860 \
    -p 8035:8000 \
    kevinchina/deeplearning:llamafactory20250311-3-swanlab bash
装个swanlab:
展开代码pip install swanlab -i https://mirrors.tuna.tsinghua.edu.cn/pypi/web/simple
可以打开webui看一下:
展开代码llamafactory-cli webui
单机训练:
展开代码export SWANLAB_API_KEY=pM7Xvs5OS2EeXPO5gKXfJ   # 设置在线跟踪模式API,这里我随便填的
export SWANLAB_LOG_DIR=/swanlab_log    # 设置本地日志存储路径
export SWANLAB_MODE=cloud     # 包含四种模式:cloud云端跟踪模式(默认)、cloud-only仅云端跟踪本地不保存文件、local本地跟踪模式、disabled完全不记录用于debug


llamafactory-cli train \
    --stage sft \
    --do_train True \
    --model_name_or_path output/18800 \
    --preprocessing_num_workers 64 \
    --finetuning_type full \
    --template qwen2_vl \
    --flash_attn auto \
    --dataset_dir data \
    --dataset grounding1 \
    --cutoff_len 4096 \
    --learning_rate 5e-05 \
    --num_train_epochs 2.0 \
    --per_device_train_batch_size 1 \
    --gradient_accumulation_steps 4 \
    --lr_scheduler_type cosine \
    --max_grad_norm 1.0 \
    --logging_steps 5 \
    --save_steps 1000 \
    --warmup_steps 0 \
    --packing False \
    --report_to none \
    --output_dir output/new_no_freeze \
    --bf16 True \
    --plot_loss True \
    --trust_remote_code True \
    --ddp_timeout 180000000 \
    --include_num_input_tokens_seen True \
    --optim adamw_torch \
    --deepspeed cache/ds_z2_config.json \
    --use_swanlab True \
    --swanlab_project llamafactory \
    --swanlab_mode cloud \
    --save_total_limit=1 \
    --load_best_model_at_end=False \
    --metric_for_best_model="eval_loss" \
    --greater_is_better=False \
    --freeze_vision_tower False \
    --image_max_pixels 1048576
llamafactory 默认情况下 freeze_vision_tower 是True,冻结了视觉编码。在Grounding 定位里,我只训练LLM,似乎结果很差。
如果要限制训练样本数量:
展开代码--max_samples 100000 \
如果要有验证集:
展开代码--val_size 0.1 \ --eval_strategy steps \ --eval_steps 100 \ --per_device_eval_batch_size 2 \
如果要用swanlab:
展开代码export SWANLAB_API_KEY=pM7Xvs5OS2EeXPO5gKXfJ   # 设置在线跟踪模式API,这里我随便填的
export SWANLAB_LOG_DIR=/swanlab_log    # 设置本地日志存储路径
export SWANLAB_MODE=cloud     # 包含四种模式:cloud云端跟踪模式(默认)、cloud-only仅云端跟踪本地不保存文件、local本地跟踪模式、disabled完全不记录用于debug
展开代码--use_swanlab True \ --swanlab_project llamafactory \ --swanlab_mode cloud \
训练结束
损失基本处于收敛状态:

模型导出
这样就可以导出了:
展开代码llamafactory-cli export \
    --model_name_or_path output/Qwen2.5-VL-7B-Instruct/full/train_2025-05-08-07-28-25/checkpoint-18800/ \
    --template qwen2_vl \
    --finetuning_type lora \
    --export_dir output/18800 \
    --export_size 5 \
    --export_device cpu \
    --export_legacy_format false
导出后的样子:
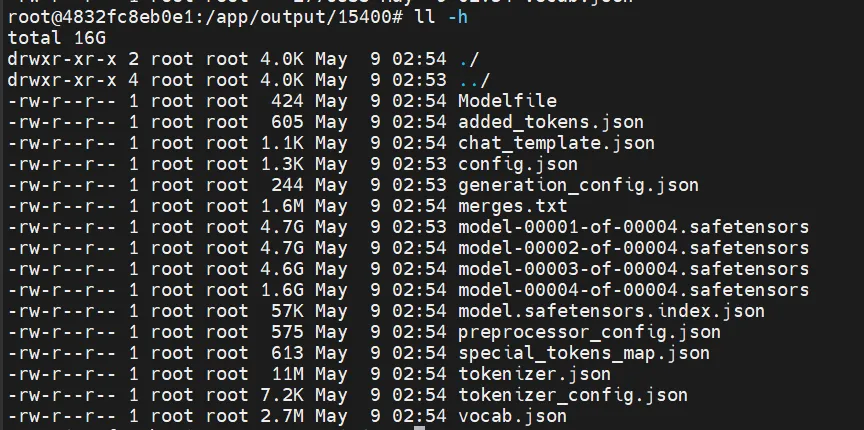
模型部署
展开代码docker run -d --gpus '"device=2,3"' \
    -v /data/xiedong/LLaMA-Factory/output/train2-28488:/model \
    -p 8056:8000 \
    --ipc=host \
    --shm-size 32g \
    vllm/vllm-openai:latest \
    --model /model --gpu_memory_utilization 0.8 --tensor_parallel_size 2 --served-model-name "qwen2vl" --max_model_len 4096  \
    --enable-prompt-tokens-details
展开代码-e "VLLM_LOGGING_LEVEL=DEBUG"
请求vllm api
展开代码def api_request(image, point_coords):
    """Send request to API endpoint"""
    url = "http://10.150.72.28:8066/v1/chat/completions"
    headers = {"Content-Type": "application/json"}

    payload = {
        "model": "qwen2vl",
        "messages": [
            {
                "role": "user",
                "content": [
                    {
                        "type": "text",
                        "text": f"点[{point_coords[0]},{point_coords[1]}]所处位置(也即是图中绿色五角星中心所处位置)的信息是什么?需要优先匹配最近UI元素的box。"
                    },
                    {
                        "type": "image_url",
                        "image_url": {
                            "url": f"data:image/jpeg;base64,{image_to_base64(image)}"
                        }
                    }
                ]
            }
        ],
        "max_tokens": 2048,
        "temperature": 0.1,
        "top_p": 0.9,
        "top_k": 50,
        "n": 1,
        "stream": False
    }

    response = requests.post(url, headers=headers, data=json.dumps(payload))
    return response.json()
得到的box不准确,直接用官方的推理代码进行尝试。
官网推理代码
执行代码,看来不是代码问题。得到的box还是不准确。
展开代码docker run -it --gpus '"device=1"' \
    --shm-size 32G \
    -v /ssd/xiedong/qwenvl_train_ui_ground_datasets:/ssd/xiedong/qwenvl_train_ui_ground_datasets \
    -v /ssd/xiedong/qwenvl25train_15400:/ssd/xiedong/qwenvl25train_15400 \
    kevinchina/deeplearning:llamafactory20250311-3-swanlab bash
展开代码pip install qwen-vl-utils[decord]
展开代码cd /ssd/xiedong/qwenvl_train_ui_ground_datasets
python compare_annotations_local.py
python:
python展开代码import base64
import json
import re
import os
import argparse
import random
from PIL import Image, ImageDraw, ImageFont
from collections import defaultdict

# Import necessary libraries for local model inference
from transformers import AutoProcessor
from vllm import LLM, SamplingParams
from qwen_vl_utils import process_vision_info

# 全局变量存储模型实例
global_llm = None
global_processor = None

def parse_box_coordinates(box_str):
    """解析边界框坐标字符串"""
    # 移除所有空格并分割
    coords_str = box_str.replace(' ', '')
    # 使用正则表达式提取坐标
    numbers = re.findall(r'\d+', coords_str)
    return list(map(int, numbers))

def init_model(model_path, max_model_len):
    """初始化模型(只执行一次)"""
    global global_llm, global_processor

    print(f"正在加载模型 {model_path}...")
    global_llm = LLM(
        model=model_path,
        limit_mm_per_prompt={"image": 10, "video": 10},
        max_model_len=max_model_len
    )
    global_processor = AutoProcessor.from_pretrained(model_path)
    print("模型加载完成!")
    return global_llm, global_processor

def infer_with_model(image_path, point_x, point_y):
    """使用全局模型进行推理"""
    global global_llm, global_processor

    # 确保模型已初始化
    if global_llm is None or global_processor is None:
        raise ValueError("模型尚未初始化")

    # 采样参数
    sampling_params = SamplingParams(
        temperature=0.1,
        top_p=0.001,
        repetition_penalty=1.05,
        max_tokens=1024,
        stop_token_ids=[],
    )

    # 准备消息
    messages = [
        {"role": "system", "content": "You are a helpful assistant."},
        {
            "role": "user",
            "content": [
                {"type": "text", "text": f"点[{point_x},{point_y}]所处位置的信息是什么?"},
                {
                    "type": "image",
                    "image": image_path,
                    "min_pixels": 224 * 224,
                    "max_pixels": 1280 * 28 * 28,
                },
            ],
        },
    ]

    # 处理消息
    prompt = global_processor.apply_chat_template(
        messages,
        tokenize=False,
        add_generation_prompt=True,
    )

    # 处理视觉信息
    image_inputs, video_inputs, video_kwargs = process_vision_info(messages, return_video_kwargs=True)

    mm_data = {}
    if image_inputs is not None:
        mm_data["image"] = image_inputs

    # 准备输入并生成
    llm_inputs = {
        "prompt": prompt,
        "multi_modal_data": mm_data,
        "mm_processor_kwargs": video_kwargs,
    }

    # 执行推理
    outputs = global_llm.generate([llm_inputs], sampling_params=sampling_params)
    generated_text = outputs[0].outputs[0].text

    return generated_text

def main():
    """主函数"""
    # 解析命令行参数
    parser = argparse.ArgumentParser(description='对比本地模型和标注数据集中的边界框')
    parser.add_argument('--dataset', type=str, default='xdx_b_intervl8btrain_28.json', help='数据集文件路径')
    parser.add_argument('--img-dir', type=str, default='img_small_size_28', help='图像目录')
    parser.add_argument('--output-dir', type=str, default='comparison_results', help='输出目录')
    parser.add_argument('--font', type=str, default='Arial-Unicode-Regular.ttf', help='字体文件路径')
    parser.add_argument('--limit', type=int, default=200, help='处理的样本数量上限')
    parser.add_argument('--model-path', type=str, default='/ssd/xiedong/qwenvl25train_15400', help='模型路径')
    parser.add_argument('--max-model-len', type=int, default=2048, help='模型最大上下文长度')
    args = parser.parse_args()

    # 创建输出目录
    output_dir = args.output_dir
    os.makedirs(output_dir, exist_ok=True)

    print(f"开始处理数据集 {args.dataset}...")

    try:
        # 首先初始化模型(只进行一次)
        init_model(args.model_path, args.max_model_len)

        # 加载数据集
        with open(args.dataset, 'r', encoding='utf-8') as f:
            data = json.load(f)

        print(f"成功加载数据集,共 {len(data)} 个样本")

        # 限制处理的样本数量
        sample_count = min(args.limit, len(data)) if args.limit > 0 else len(data)
        samples_to_process = random.sample(data, sample_count)
        print(f"将随机处理 {sample_count} 个样本")

        # 加载字体
        font_path = args.font
        try:
            font = ImageFont.truetype(font_path, 16)
            print(f"成功加载字体: {font_path}")
        except IOError:
            print(f"警告: 无法加载字体 {font_path},使用默认字体")
            font = ImageFont.load_default()

        # 处理每个样本
        for i, sample in enumerate(samples_to_process):
            try:
                # 获取图像路径
                image_path = sample['images'][0].replace('/img_datasets/', '')
                full_image_path = os.path.join(args.img_dir, os.path.basename(image_path))

                if not os.path.exists(full_image_path):
                    print(f"警告: 图像 {full_image_path} 不存在,跳过")
                    continue

                # 获取用户消息和助手消息
                user_message = sample['messages'][0]['content']
                assistant_message = sample['messages'][1]['content']

                # 解析用户消息中的点坐标
                point_match = re.search(r'\[(\d+),\s*(\d+)\]', user_message)
                if not point_match:
                    print(f"警告: 无法从用户消息中解析点坐标: {user_message}")
                    continue

                point_x, point_y = int(point_match.group(1)), int(point_match.group(2))

                # 解析助手消息中的引用文本和边界框
                ref_match = re.search(r'<ref>(.*?)</ref>', assistant_message)
                box_match = re.search(r'<box>\[(.*?)\]</box>', assistant_message)

                if not (ref_match and box_match):
                    print(f"警告: 助手消息中缺少引用文本或边界框: {assistant_message}")
                    continue

                ref_text = ref_match.group(1)

                # 解析标注数据集中的边界框坐标
                annotation_box_coords = parse_box_coordinates(box_match.group(1))

                print(f"处理样本 {i+1}/{sample_count}: {full_image_path}")
                print(f"  点坐标: [{point_x}, {point_y}]")
                print(f"  标注文本: {ref_text}")
                print(f"  标注边界框: {annotation_box_coords}")

                # 使用全局模型进行推理
                model_response = infer_with_model(full_image_path, point_x, point_y)

                # 解析模型响应
                vllm_ref_match = re.search(r'<ref>(.*?)</ref>', model_response)
                vllm_box_match = re.search(r'<box>\[(.*?)\]</box>', model_response)

                if not (vllm_ref_match and vllm_box_match):
                    print(f"  警告: 模型返回内容缺少引用文本或边界框: {model_response}")
                    continue

                vllm_ref_text = vllm_ref_match.group(1)
                vllm_box_coords = parse_box_coordinates(vllm_box_match.group(1))

                print(f"  模型文本: {vllm_ref_text}")
                print(f"  模型边界框: {vllm_box_coords}")

                # 打开图像并准备绘制
                img = Image.open(full_image_path)
                draw = ImageDraw.Draw(img)

                # 绘制点 - 黑色实心圆点
                point_radius = 5
                draw.ellipse((point_x-point_radius, point_y-point_radius,
                             point_x+point_radius, point_y+point_radius),
                             fill=(0, 0, 0), outline=(255, 255, 255))

                # 绘制标注数据集中的边界框 - 绿色
                if len(annotation_box_coords) == 4:
                    x1, y1, x2, y2 = annotation_box_coords
                    draw.rectangle([x1, y1, x2, y2], outline=(0, 255, 0), width=2)
                    # 在边界框上方添加标注文本
                    draw.text((x1, y1-20), f"原标注: {ref_text}", font=font, fill=(0, 255, 0))

                # 绘制模型预测的边界框 - 红色
                if len(vllm_box_coords) == 4:
                    x1, y1, x2, y2 = vllm_box_coords
                    draw.rectangle([x1, y1, x2, y2], outline=(255, 0, 0), width=2)
                    # 在边界框下方添加模型文本
                    draw.text((x1, y2+5), f"模型: {vllm_ref_text}", font=font, fill=(255, 0, 0))

                # 保存结果图像
                output_filename = f"compare_{i+1}_{os.path.basename(image_path)}"
                output_path = os.path.join(output_dir, output_filename)
                img.save(output_path)
                print(f"  已保存结果图像: {output_path}")

            except Exception as e:
                print(f"处理样本 {i+1} 时出错: {e}")

        print(f"\n处理完成. 结果已保存到目录: {os.path.abspath(output_dir)}")

    except Exception as e:
        print(f"发生错误: {e}")

if __name__ == "__main__":
    main()
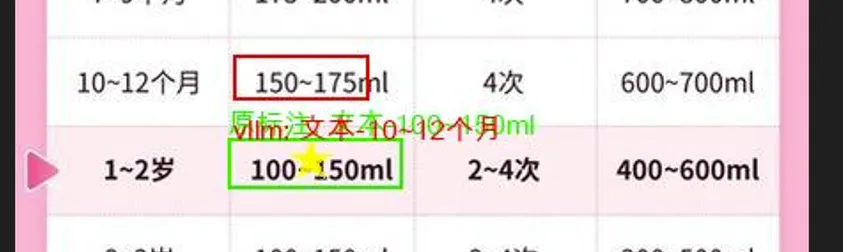
第一次训练结果
训练还没有结束,但对比训练的最开始和现在,模型效果得到了很大改善。

改善点:对于没有歧义的内容效果不错,box没有产生偏移,说明Qwen2.5VL具有Grounding Box定位能力(只要照片宽高是28 * n)。图中五角星中心是给入的Query点,绿色是 label grounding box, 红色则是Qwen2.5VL 给出的box。
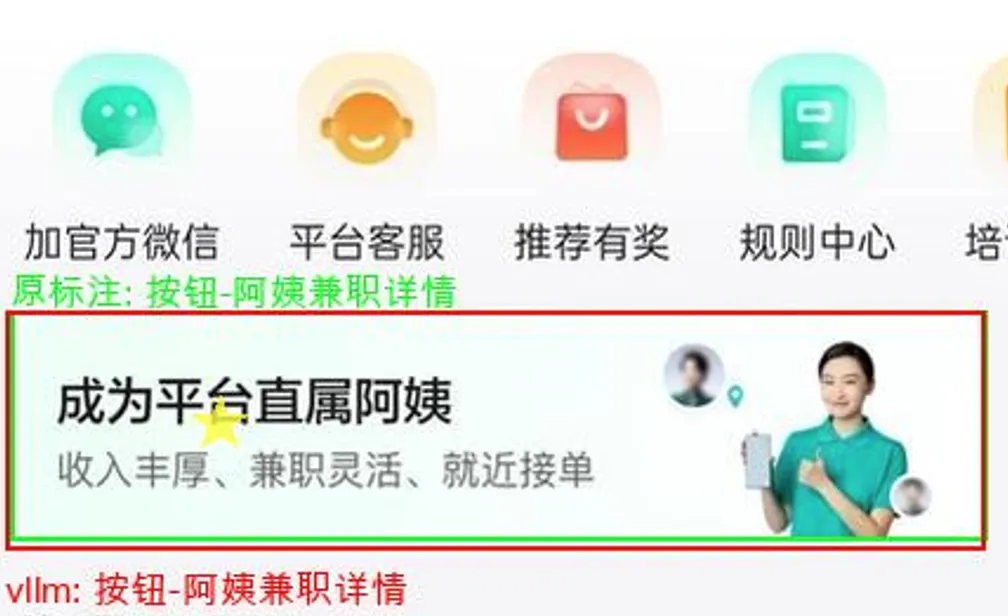
失败点:框的语义混淆。(准备向Query里加提示改善,但肯定不能完全ok,想着可以多要按钮的)
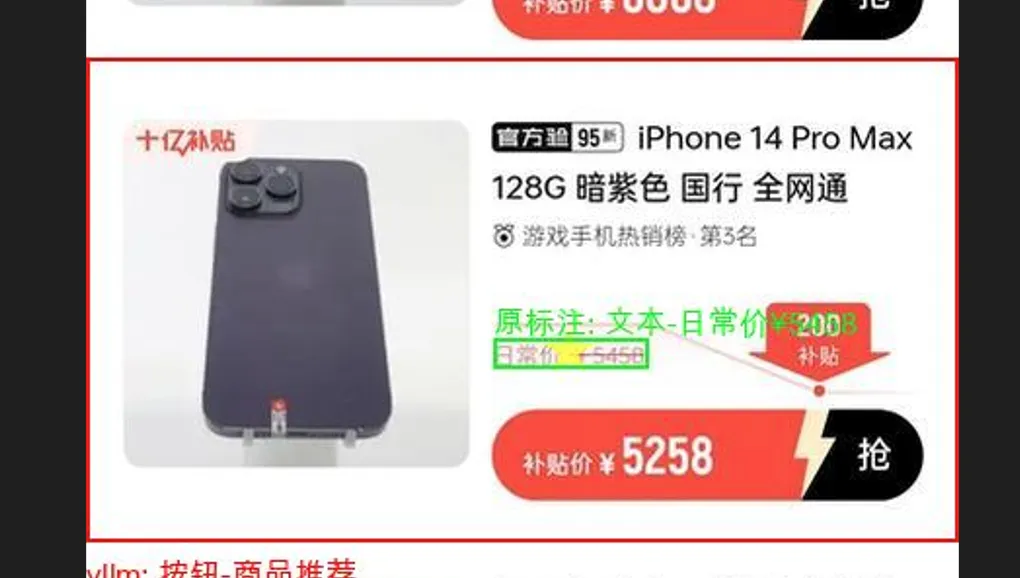
失败点:错误识别给入的x和y了。(准备向图片里加个什么五角星,辅助模型在图里的定位)


本文作者:Dong
本文链接:
版权声明:本博客所有文章除特别声明外,均采用 CC BY-NC。本作品采用《知识共享署名-非商业性使用 4.0 国际许可协议》进行许可。您可以在非商业用途下自由转载和修改,但必须注明出处并提供原作者链接。 许可协议。转载请注明出处!